
It feels like I’ve been waiting 10 years for this moment: to have my Notes desktop running in a browser. No plugins, no ActiveX controls. No web coding! Just my Notes databases, as I’ve always had them, and always built them, but then without the Notes client. And here I am! Thanks to Nomad…. and to a puzzling configuration solved by HCL Support.
Let me take you through it.
My starting point was a Domino environment (a Linux VM) which started on Domino 9 and was upgraded to 14. Yes, some big steps and some missing puzzle pieces were to be expected. Namely, I think some data was needed for a good upgrade to Domino 14 with regards to the Domino Directory. More on that in a bit. I upgraded to Domino 14 FP1, and then installed Nomad version 1.0.12.
https://help.hcltechsw.com/nomad/1.0_web/nomad_web_new.html
I found the instructions online for setting up Nomad to be often incomplete, or they assumed some starting point that I didn’t have. Or assumed I knew basic things that I just didn’t. Ultimately I had to reach out to HCL Support and they were terrific in helping me out.
I read some documentation online and it said I needed a CertStore database. So, I created one via File->New Database.
That was a mistake. The idea is to let the CertMgr task do this for you the first time it runs on the server. So, we deleted the CertStore.nsf database.
But before we let the CertMgr task make a CertStore database, we found that the CertMgrServer was not set in the Domino Directory. So… as you can imagine, the Domino Directory needs to know which server (I only have one) will be handling certificates.
My Domino Directory was missing the CertMgrServer field in the “directoryprofile” Profile document. As you know, we can’t see the profile document, so to add this field, we made an agent (target set to None) and ran it in the Domino Directory.
@SetProfileField(“directoryprofile”; “CertMgrServer”;”CN=Quanology/CN=Quanology”);
@All
Now the field was filled. So, we ran the CertMgr via the Console command:
Load CertMgr
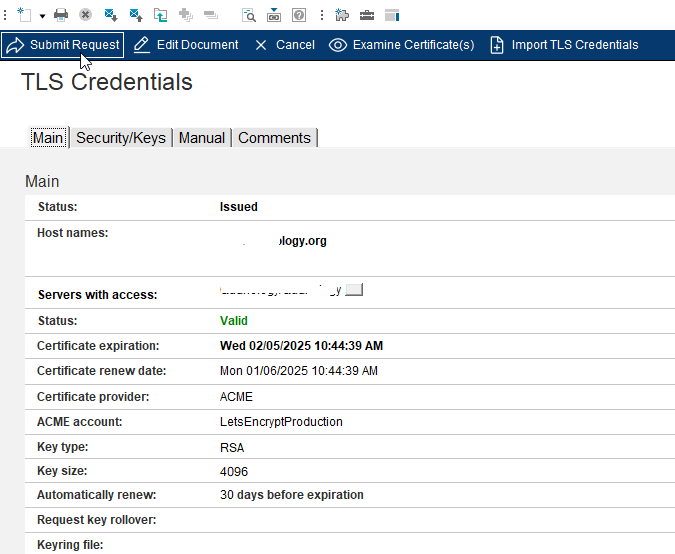
And, yes, it created the CertStore.nsf WITH THE “TLS Credentials” document.
I filled out some of the fields that asked for basic info on the organization, as is standard practice when creating an SSL certificate. I also used the LetsEncryptStaging certifier.
But before I clicked submit, I made sure that the server was open on Ports 80 and 443 for the Let’sEncrypt service.
Note: Make sure both the Let’sEncrypt “ACME Accounts” documents have their terms accepted.
Of course, what you also need to do is set the web domain (URL) you will be using to access your Domino server in the Server document in the Ports->Internet Ports tab in the TLS Keyfile Name field. Yes, in Notes 9 with your own certificate, you would have filled in the filename of the keyring file. No more… now it needs to match up with the domain in your TLS Credentials document.
Then when you are done with the TLS Credentials document, click the Submit button. Within a few seconds, it should have created a certificate for you.
Since I started with the Let’sEncryptStaging certificate, and that went well, I now switched it to Let’sEncryptProduction in the TLS Credentials. Then I clicked Submit again.
Again, it created a certificate successfully within seconds, and I could open my Domino environment from the web.
Next step was of course, Nomad.
I made the following updates to my notes.ini file in the Domino Data directory.
Notes.ini
- Add Nomad and CertMgr to your tasks
- Add Nomad Web config
- And a few more parameters
Then you have to create a Nomad-config.yaml file in the Domino Data directory too. The contents of mine are as follows. All generic, default stuff.
host: '0.0.0.0'
port: 9443
You can use a different port, but I just kept it standard.
More info here: https://help.hcltechsw.com/nomad/1.0_admin/config_options.html
Then just reload the Nomad task on the Domino server.
You should now be able to access Nomad via the designated URL. You just need to add the 9443 port and /nomad.
Mine was “subdomain.domain.com:9443/nomad”
I’m sure a network engineer can make a friendlier URL (ie, a URL without the port number on the end, and without the extra “/nomad”), but for me, for now, it’s fine.
But… I still couldn’t log in to Nomad. I needed an ID Vault – something I’ve seen in the Admin client, but always ignored.
You need to create an ID vault and copy all necessary Notes IDs to the ID Vault.
Any problems? Here is the HCL Nomad forum: https://support.hcltechsw.com/community?id=community_forum&sys_id=3b962d581b1104d483cb86e9cd4bcbae
Good article! How are your databases working in Nomad?
hi Heather! Thanks. So far, not doing anything too complicated, but no real issues. I see in a customized mail template that it looks like the modern Notes 9 template in the client, but in Nomad, it reverts to older looking views.
-John